
Mini cabinet from Ikea is probably the most popular object for decoration. It could be painted various colors, upholstered with cloth, napkins, lace, put a variety of accessories and dried flowers. Here s a tutorial by Irina from buz_art where she shows how she painted one.

You will need:
- Cabinet;
- A hammer;
- Sandpaper;
- White acrylic paint, gold paint in a spray;
- PVA glue;
- Lacquer
- glass сontour;
- Brush, small roller.

1. We put together our cabinet.


2. Use the sandpaper to smooth down the surface then paint it with a mixture of PVA glue and white acrylic paint (1:1). Paint the larger areas with the roller, and the corners with the brush.

3. Again smoothing with soft sandpaper.

4. Wipe with a damp cloth just to remove the dust.

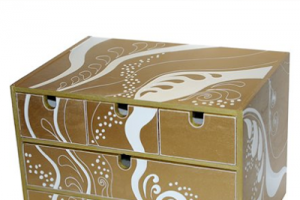
5. Next Irina covered with gold paint the exterior of the cabinet. She has used the cheapest gold paint in spray from a car shop. The ends and inside she left to be white.

6. After the paint is completely dry we put a contour on the drawers.

7. Paint the edges of the drawers with gold paint

8. Here is how our cabinet looks like in the middle stage.


9. Close all the drawers and paint a contour of the painting.

10. Some of the details we paint with white paint or you can use the acrylic paint from the previous stages.
11. Polish the finished cabinet with the lacquer… and … ready :))))
 Малкото шкафче от ИКЕА е може би най-популярния предмет за декориране. Боядисват го с различни цветове, облицоват го в плат изобщо всякакви неща. Днес обаче ще разгледаме урока на Ирина – ето какво прави тя със своите мини шкафчета.
За целта са необходими:
- – шкафчето
- – чук
- – шкурка
- – бяла акрилна боя, златна боя-спрей
- – лепило
- – лак
- – боя за стъкло
- – четка и малък валяк.
И така….
1. сглобяваме нашето шкафче
2. Използвайте шкурката за да отстраните неравностите и след това боядисайте шкафчето със смес от равни части от лепилото и бялата акрилна боя. Боядисвайте по-голямата част с валяка, а за ъглите – използвайте четката.
3. загладете повърхността с много мека шкурка.
4. Забършете с чиста кърпа шкафчето, за да отстраните мръсотията.
5. Ирина използва златната боя, за да боядиса външната част на шкафчето. Тя използва сравнително евтина златна боя под формата на спрей от магазин за автомобилни бои. Краищата и вътре тя оставя бели.
6. След като боята е напълно суха ние започваме да правим контури по чекмеджетата.
7. Боядисваме ръбовете на чекмеджетата със златна боя.
8. След всичко това затваряме чекмеджетата и…
9. започваме да рисуваме контурите на нашата рисунка.
10. някой от детаилите можем да рисуваме с бяла боя или да използваме акрилната
11. полираме с лак и сме готови.
Би трябвало да се получи чудесно. Аз още не съм пробвала този урок, но обещавам тържествено в най-скоро време да се заема с него.
Leave a Reply